Azure has a number of different storage services. The service is made up of different ‘layers’ shown below:
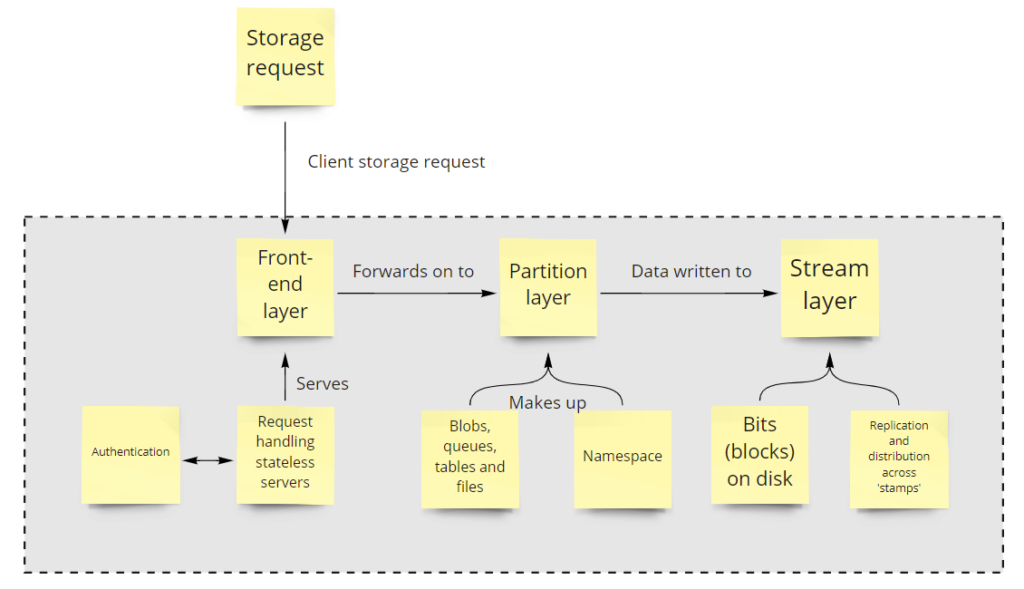
The most important takeaways from the diagram above are the stream layer and the namespace.
The stream layer handles the writing of data to the physical disks within the Azure datacentre, subject to the different type of Storage Account replication, this could be written locally (synchronously) or written across different regions (asynchronously). More on that later!
What’s in a name…?
Well, apparently quite a lot in the world of clouds.
This is because to service client requests, the client must first be able to resolve the address via the internet, and as such the namespace must be managed carefully in order to be globally unique amongst tenancies.
You can use DNS CNAME records to mask the Azure path via the use of Custom Domains. It can make it much more user friendly, changing from https://storageaccountname.blob.core.windows.net to https://mystuff.mydomain.com
Azure Storage Accounts
Whilst that describes the overall service at a super high level, the most fundamental construct within Azure Storage is the Azure Storage Account. This is essentially a container for the necessary storage services you would like to offer to specific customers and services. Without a Storage Account, you simply will not be able to use Azure Storage services.
A Storage Account can be configured to be one of the following types:
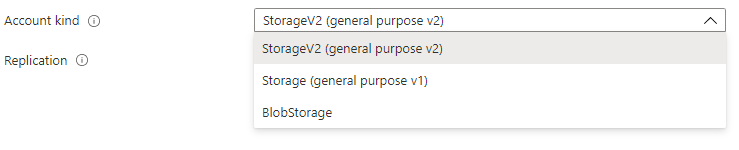
Whilst I am a fan of Microsoft, the naming convention does not really give much away, so I’ll describe these a little here:
- General purpose (v1) storage – enables customers to create blobs, files, queues and table storage. This was the original storage account type service offering in the Azure Service Management model (or classic mode). You might be wondering why this has been left in, but I believe there are still customers who may use the classic deployment model for some of their critical ‘legacy’ services.
- General purpose (v2) storage – offers all of GPv1 storage (blobs, files, queues and tables) but you’ve guessed it, using the newer Azure Resource Manager model. It also includes newer features such as hot and cold access tiers. It’s really a case of ‘more of the same, but newer please’.
- Blob storage – are particularly specialised types of accounts, offering support for only block or append blob types.
What on earth are blobs?
Binary Large Objects
In the real world, these are simply unstructured object data. Think text files, images, videos or Virtual Machine disks.
Azure blob storage is built for scale and performance (supports petabytes of capacity and gigabits per second transfer rates). It can be accessed anywhere via REST/HTTP.
In the general purpose storage account types, you can store block blobs or page blobs.
- block blobs (data is written to blocks – think of this as streamable data) = Images and other multimedia files. Max 4.75TB in size
- page blobs (data is written using ‘pages’, in Azure this is done in 512-byte page bytes) = Virtual Machine disks. All Azure based VMs use page blobs for VM disks. Max 8TB in size
Blob storage offers:
- block blobs (as described above)
- append blobs (data is written to blocks, but in a manner that is optimised for appending data only) – a good use case would be logging data
- only runs on ‘Standard’ performance disks
You can even create static websites using the Azure blob service. This creates a $web container where you can place your static content (only client-side scripting is allowed).
You mentioned containers…
Yes indeed, these aren’t to be confused with Container Instances (Docker, Kubernetes and such)!
Containers (in the Azure Storage Account context) refer to the logical organisation of blobs and the associated permissions required to access them within a Storage Account. Think of folders and directories in Windows and you kinda get the idea… However, it is a virtual construct. This means that Azure merely prefixes the folder name to the beginning of the file name. This is similar to AWS S3 bucket prefixes.
Confusingly, you may also see references to ‘Container Services’ within Storage Accounts. This is just another name for blob storage (i.e. the organisation of blobs within containers – or the logical folder structure for blobs).
Files, Tables and Queues
We’ve talked blobs, but there are also other services that run within Storage Accounts.
Files
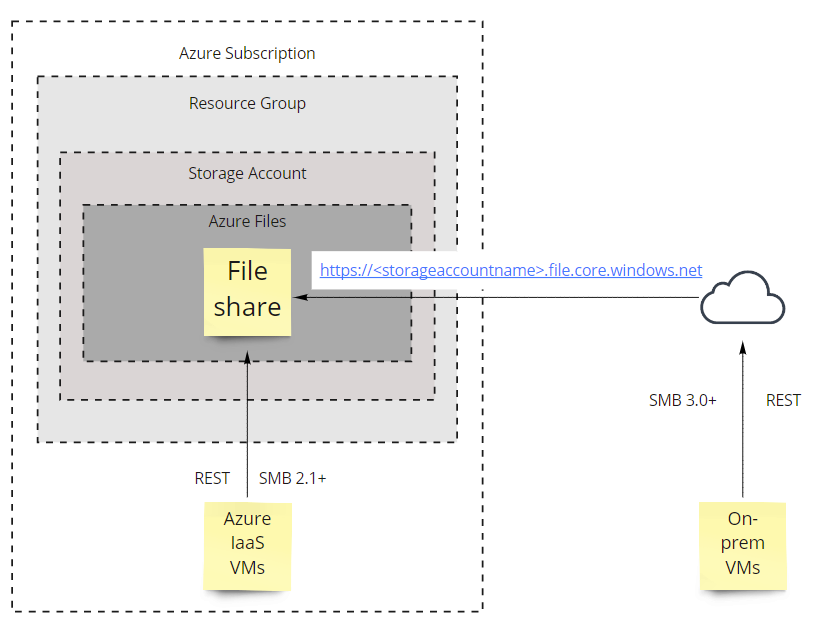
Files are essentially an Azure based file share that can be accessed over the internet for on-premises (or cloud based) Windows (or Linux with the SMB kernel client) servers. Files provides the true hierarchical folder structure that is absent in blob containers. You can access the shares via SMB, NFS or REST (via HTTP/HTTPS). The API endpoint is https://<storageaccountname>.file.core.windows.net. However, there is difference between what SMB versions are available to clients, depending on whether the VM is inside Azure or outside. See diagram below.
Using Files you can create a share that is 5TB in size by default. You can override this in the Storage Account setting to allow Large File Shares (up to 100TB). To do this navtigate to your Storage Account > Configuration > Enable Large file shares. If you enable this, you cannot geo-replicate the Storage Account and the change is made permanent, so use with caution!
Once you have created the file share, the next step would be to mount it in your OS of choice. You can do this by clicking on the ‘Connect’ button in the Azure Portal, which will bring up the connection string for the different OS types:
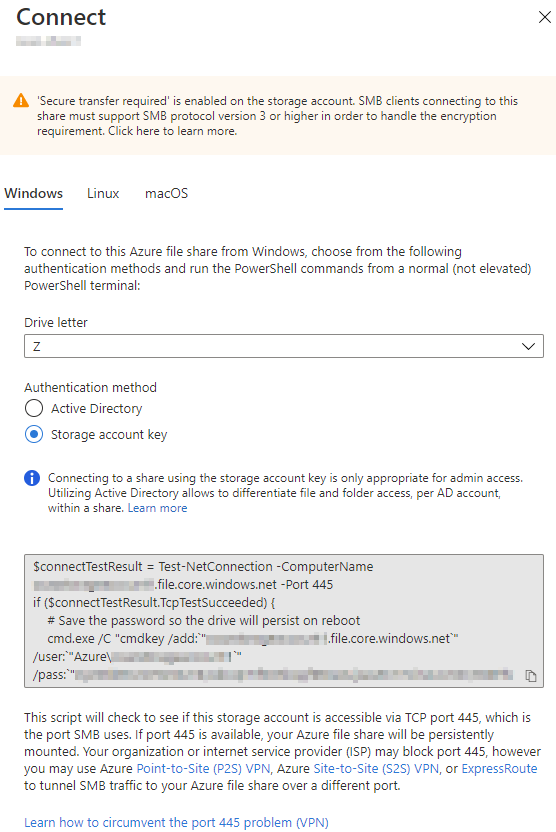
In Windows, this is a PowerShell script, you can also mount the share in Linux and macOS.
Please note the text at the bottom of the image. You will need to be able to contact the Azure File service via TCP port 445, if this is blocked by your ISP or network admins, you will need to consider alternative connectivity such as VPNs.
The storage account key (access key) is used above, so remember, if you regenerate that key, you will disconnect any file operations to the Azure file, which may or may not have a disastrous affect on your services (especially if mid-way through writing some files)!
Tables
Tables are good for storing non-relational, semi-structured key value pairs. This is essentially a No-SQL service.
Entities (rows) within Tables have a minimum of three properties (these are called system properties):
- Partition key (string) – you can define which partition you want to store your data, it allows Azure to split your tables across multiple servers
- Row key (string) – identifies the row of the data within the partition, think of this as the unique ID for the row
- Timestamp – a date time provided by Azure
You can have up to 252 additional custom properties beyond this for your data.
You can have identical row keys in different partitions, I have demonstrated this below in PowerShell:
#First of all, connect to Azure
Connect-AzAccount
#Declare necessary variables
$rgName = "<resourcegroupname>"
$accountName = "<storageaccountname>"
$tableName = "<tablename>"
#Partition names are arbitrary here
$partitionKey1 = "part1"
$partitionKey2 = "part2"

#Connect to the Table storage
$storageAccount = Get-AzStorageAccount -ResourceGroupName $rgName -Name $accountName
$context = $storageAccount.Context
$storageTable = Get-AzStorageTable -Name $tableName –Context $context
$cloudTable = (Get-AzStorageTable -Name $tableName -Context $context).CloudTable

#Add records to the Table storage
Add-AzTableRow -Table $cloudTable -PartitionKey $null -RowKey "1" -property @{"Title"="Azure is cool"; "ID"=1}
Add-AzTableRow -Table $cloudTable -PartitionKey $null -RowKey "OC1" -property @{"Title"="Azure is so cool"; "ID"=2}
Add-AzTableRow -Table $cloudTable -PartitionKey $null -RowKey "OC" -property @{"Title"="Azure is cool"; "ID"=1}
Add-AzTableRow -Table $cloudTable -PartitionKey $partitionKey1 -RowKey "1" -property @{"Title"="Azure is cool"; "ID"=1}
Add-AzTableRow -Table $cloudTable -PartitionKey $partitionKey2 -RowKey "OC1" -property @{"Title"="Azure is so cool"; "ID"=2}
Add-AzTableRow -Table $cloudTable -PartitionKey $partitionKey1 -RowKey "OC" -property @{"Title"="Azure is cool"; "ID"=1}
Add-AzTableRow -Table $cloudTable -PartitionKey $partitionKey1 -RowKey "OC1" -property @{"Title"="Azure is so cool"; "ID"=2}

#Get results
Get-AzTableRow -Table $cloudTable | FT
If you run the above, you will notice two things:
- You can actually pass a null partition
- You can create identical rows (same Row key) in different partitions

You can store as much data in the Table Storage as the parent Storage Account allows (i.e. maximum of 500TB). You also don’t need to shard datasets as the datasets scale. It is cheap to use Table storage (but you must consider both capacity usage and number of transactions) and it is easy to use.
However, storage latency is not guaranteed! If you need low latency writes to some form of table storage, consider using Cosmos DB Table API services instead. Table storage also does not support CORS (Cross-Origin Resource Sharing).
The partition key and row key can be up 1KB in size. The size of an individual entity (row) can be up to 1MB.
Queues
Queues offer a way to provide messaging between applications or services. You can think of this as an integration service, decoupling and routing messages between apps as needed.
Things to consider:
- Messages in a queue are 64KB in size
- Messages are first in, first out
- Messages in a queue, can be expired according to a pre-specified timer
Queues are a basic form of inter-app messaging, for more advanced features, you should consider the use of an Azure Service Bus.

Security
Remember when I said that the namespace is super important? Well, if someone knows the name of your storage account, and you maybe, perhaps, ok… definitely cut some corners when you rushed out that Azure storage assignment that was given to you, it can make for a very bad ending to a short story.
All services in a Storage Account can be accessed via https://<storageaccountname>.<servicetype>.core.windows.net, see the diagram below.
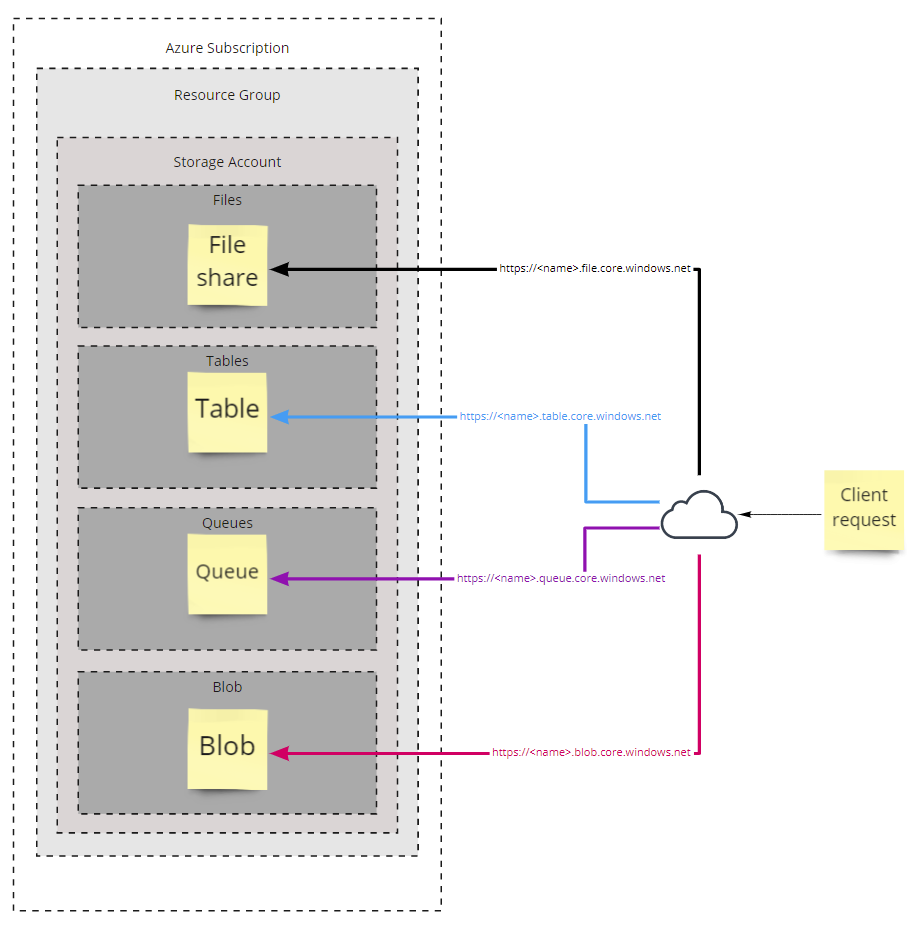
So if some bad person out there, was able to find your unsecured Storage Account, they’d be able to read the contents of each service listed above. Yep, people out there have experienced the joy of leaving confidential content exposed over the internet…
So bringing this back to the containers conversation a short while ago, please see the diagram below, for my Storage Account settings:
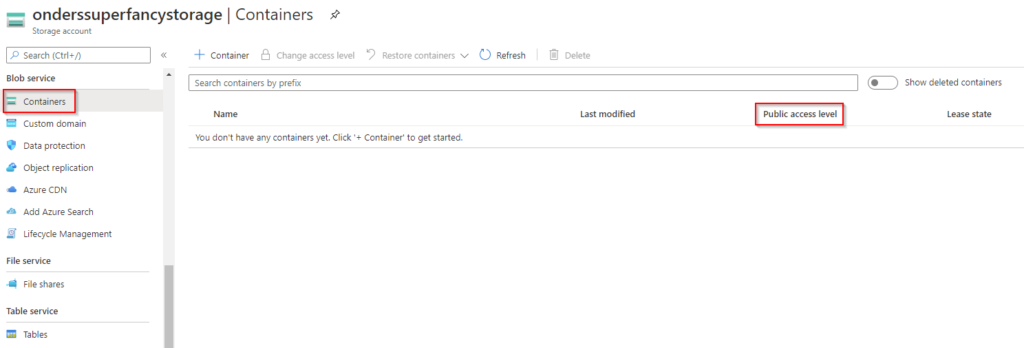
If we click on + Container to add new a container to the Storage Account, you will see the following:
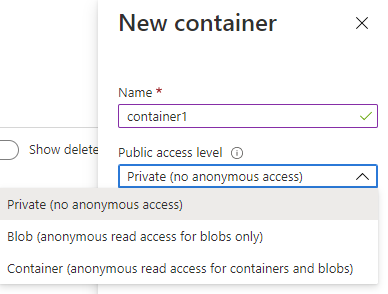
There are three public access levels available, and these are pretty self-explanatory:
- Private (i.e. you must use some form of authentication/authorisation to access the blob)
- Blob (you can access the blob data anonymously but not any data within the container)
- Container (you can access both blob and container data anonymously)
These settings are not inherently dangerously in and of themselves, but you must use caution to ensure that you don’t accidentally expose confidential or sensitive materials using one of the looser public access levels.
A quick example of how this can be dangerous is, if you know someone’s Storage Account name and you know the name of a publicly accessible container (yup, I’m sure there are a few “container1’s” out there), you could run the following PowerShell script to find all the blobs in the container and download them locally.
$accountName = "storageaccountname"
$containerName = "container1"
$anonymousContext = New-AzStorageContext -StorageAccountName $accountName -Anonymous -Protocol Https
$blobs = Get-AzStorageBlob -Container $containerName -Context $anonymousContext
foreach ($blob in $blobs) {
     Get-AzStorageBlobContent -Blob $blob.Name -Container $containerName -Context $anonymousContext -Destination ("C:\Temp\" + $blob.Name)
 }
Access Keys
Storage Accounts are primarily protected by Access Keys (also known as ‘Shared Keys’ or ‘Account Keys’), which act as authorisation keys. To gain access to the Storage Account, you provide the Access Key as part of your request and away you go.
You get two of these (a primary and secondary key). If somehow a key is compromised, you can regenerate it or switch to using the other key. Doing so, invalidates all incoming requests that used the previous Access Key and can lead to service disruption if it is not managed carefully.
Access Keys can also be used to generate another sort of ‘key’ called Shared Access Signatures (SAS).
Shared Access Signatures
Shared Access Signatures are a special type of URI, which allows you to create more granular access to individual resources within a Storage Account.
SAS is time-bound, making it a more secure way to delegate access to resources than Access Keys, which are not time-bound. If someone knows your Access Key, they have unrestricted access to your storage, whereas SAS only permits certain actions against specific endpoints for a certain amount of time.
SAS types
SAS comes in three flavours:
- Service SAS – secured using the storage Access Key, provides delegated access to individual blob, file, table and queue services. There are a few limitations:
- Containers, queues and tables cannot be created, deleted or listed
- Container metadata and properties cannot be read/written
- Queues cannot be cleared and their metadata may not be written
- Containers cannot be leased
- Account SAS – secured using the storage Access Key, in addition to service SAS functionality, it provides access to those restricted items above, making it more powerful than Service SAS
- User delegation SAS – applies to blob storage only and is secured using Azure Active Directory, has the same rights as an Account SAS
The following screenshot provides an example of what you can perform within the Azure portal:
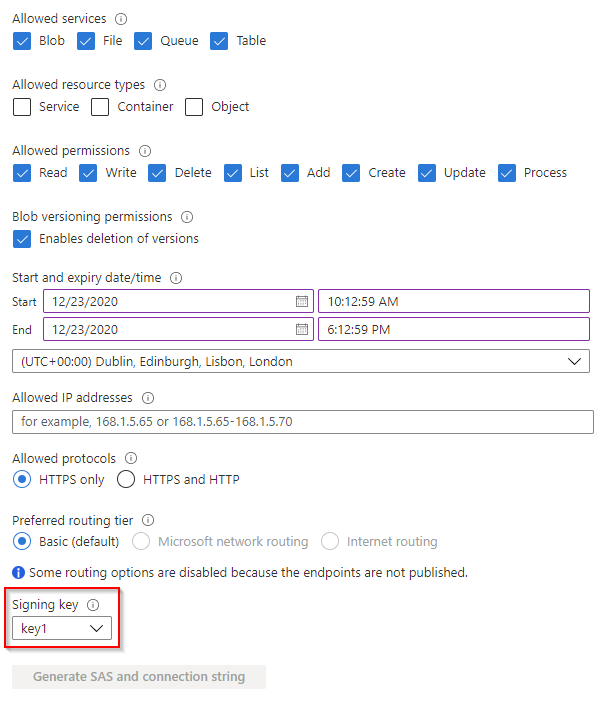
You can used trusted IP addresses/ranges for where the SAS can be used from, this could be a great way to secure storage access to trusted networks, or if you can proxy storage requests from public clients.
Great! Sign me up for SAS!
As with everything, before you sign up, read the small print…
Some Azure services can only be accessed (at this point it’s only Azure Files via SMB) using storage Access Keys. You can find the latest support matrix in MS docs here: https://docs.microsoft.com/en-us/azure/storage/common/storage-auth.
So it’s a choice between architecture and trust – for example, are you ok with your File Server administrators who want to use Azure Files, with the storage Access Key? This might be ok if your admins look after the Azure estate (or have their own Azure subscription/Storage Account), but this might not always be the case.
If a SAS is leaked, the full privileges of that SAS are leaked with it. So if a SAS has read/write/delete privileges across your storage resources and is compromised, the person who has that SAS has those same privileges.
Also, remember that SAS is time-bound, which means that if an application requires a SAS, and it has subsequently expired, the application will require a new SAS to have continued access to the storage resources. If the application cannot obtain a new SAS, there will be service availability issues.
Finally, once you have released a SAS into the wild, you cannot alter its permissions. If you need to revoke the SAS, you’d want to do so as quickly as possible. To do this, you should use stored access policies. This allows you to revoke the SAS without having to regenerate the storage Access Keys.
MS best practices can be found towards the end of this article: https://docs.microsoft.com/en-us/azure/storage/common/storage-sas-overview
Stored Access Policy
This is sort of like a parent SAS – one SAS to rule them all sort of thing.
As mentioned earlier, they allow you to revoke or change SAS privileges even after they are released into the wild.
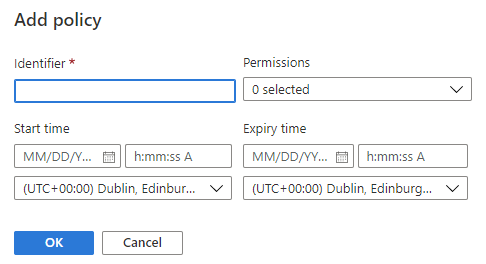
To create Stored Access Policies in the Azure portal, navigate to the storage account, then to Blob service > Containers. Click into the container in question and you will see Access Policy.
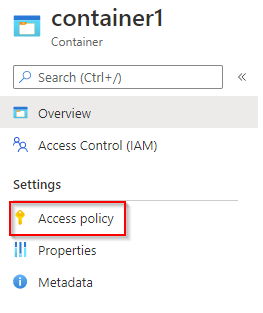
You can then add a new policy as shown below
Stored access policies are currently not supported for an account level SAS, so take extra care, when creating account level SAS!
In this section, you can also create ‘Immutable blob storage’ policies, such as legal holds or time-based retention.
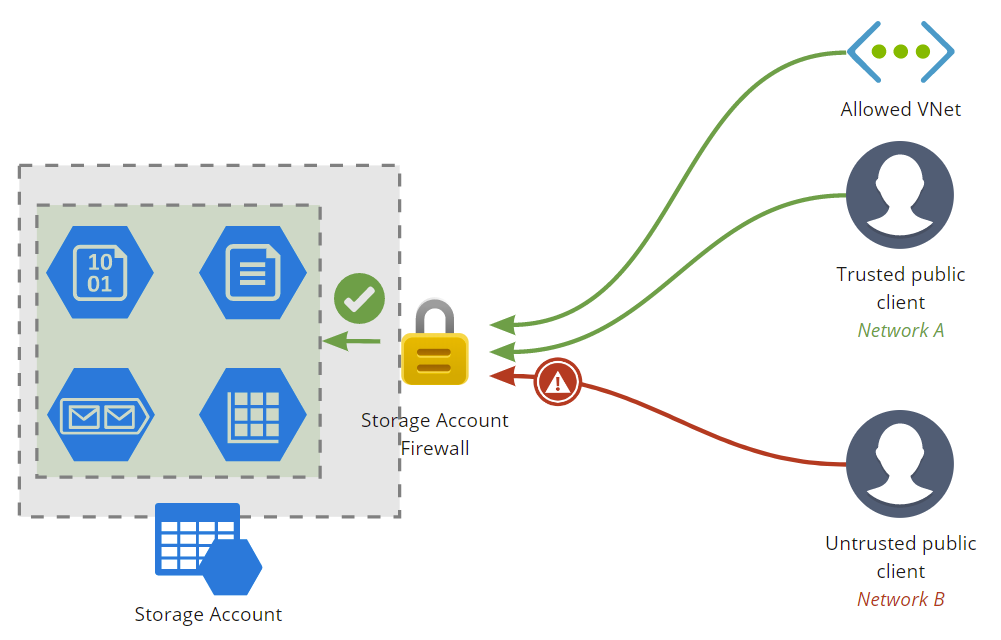
Storage Account Firewalls
Storage Account Firewalls allow you to allow or deny access to the storage account based on the network the request is originating from.
To configure Storage Account Firewalls, navigate to Storage Account > Networking.
You can either allow access from all networks or choose which networks you want to allow access to (i.e. subnets within VNets). You can also allow VNets from other subscriptions.
You can also add trusted public IP ranges to allow internet access to the Storage Account.
Some extra configuration items
The following items are listed under Storage Account > Configuration:
- You can disable Blob public access at the Storage Account level which can override all child container public access settings. The default is set to public access being enabled
- The TLS version can be lowered to v1.0 in Storage Account
- You can change replication settings (from LRS to GRS or RA-GRS and vice versa)
- You can use Azure AD for Azure File shares